Showing posts with label Tutorial. Show all posts

Monday, December 6, 2010

A Scrappy Garland


My weekend was spent trying to figure out decorations for a 7 ft tall tree with the not a whole lot of stuff that I have from previous years of decorating much teenier trees.  The garland had me stumped, and to be honest I was having a hard time committing to one enough to actually make it or (Gasp!) buy it.  We were on the verge of having a paper chain or some such other disposableness when it dawned on me that I have a huge bucket-o-scraps and some less than loved yarn to work with.  So, off to the scrap bucket with me...

...

It should now be obvious to y'all that I am a pack rat of the worst sort.  I mean do you see the tiny bits of fabric that I just can't part with?  Because, you know, I really might need them some day...like yesterday!  So, I dove in and chopped up anything that wasn't already small enough.  If your kids are hanging around they would have fun with this part too...

...

Then I cut a length of yarn.  (Keep the length manageable.  You can always make multiples.)  I plopped down my first scrap and started stitching.  If you're interested in the more exacts...the widest zig-zag setting was used to ensure that I caught my yarn.  I placed the scraps at random along the yarn leaving gaps in between and made sure to keep my yarn heading towards the center of my sewing foot.  I also back stitched a few times on the first and last scrap to secure.

...

This was seriously easy peasy lemon squeezy kind of stuff.

...

And I love the results.

...

As I was stitching these I played with overlapping scraps which produces a fun layered look.  And, if you've got metallic thread lying around, that would make a pretty addition.  However, I just used white thread and was super pleased.

If all goes as planned today, we'll be sipping hot chocolate, listening to Christmas carols, and decorating the tree!  Can't wait! 

Does your family have any favorite Christmas tunes? 


Friday, January 22, 2010

He Cooks With Felt

I  started making felt food a couple of months ago.  I was going to make something here and there until I had a little collection put together as a surprise for Levi.  Wedding plans got in the way, so I set aside the two eggs and almost finished orange slice.  Of course, I thought I set them aside where little munchkin hands wouldn't find them....ha ha....

Untitled-21

Untitled-17
Levi totally doesn't give a rip that the orange slice isn't finished.  In fact I think he might have lost it already.  The eggs were definitely his favorites.

The eggs are really so stinkin' easy to make:

~Fold a piece of white felt in half.  Cut out an amoeba like shape (if you aren't confident in your amoeba cutting skills then just go for a circle or oval).  You should have two matching pieces.
~Now cut a smallish, orange felt circle for the yolk.  You want it to be in proportion to your egg whites.
~Blanket stitch the orange circle to one of the white felt pieces using yellow or orange embroidery thread.  Leave a small opening and lightly stuff with cotton.  Finish blanket stitching until closed.
~Now sandwich the two egg white pieces together yolk facing outwards.  Blanket stitch all the way around with white embroidery thread.
~Voila!  Your little chef is ready to cook up some eggs...

Untitled-7 copy

Monday, January 11, 2010

A Barefoot Tutorial...Game Bag

*This tutorial was featured on Craft Gossip and One Pretty Thing*


As an Epiphany present I made this game bag for Levi.  On one side is a matching game and on the other is tic-tac-toe.  The bag holds all of the pieces, so it's handy for on the go play.

Supplies:
2--12 x 12 in pieces of felt for the bag body
1--20 x 2 in piece of felt for the handle
2--9 in pieces of felt for the gameboards
Felt scraps for the shapes (I also used some fleece scraps)
Embroidery floss (if you don't like to hand sew this could be entirely machine stitched)
Needle

Step one: Cut out all of your pieces.  For the bag and game board see the sizes in the "Supplies" section.  For the matching game I used 9 shapes: a square (which Levi calls a helicopter...go figure), a triangle, a doughnut (also called punkin' pie around here...he's still not over his October pumpkin obsession), a star (Levi's favorite shape in the universe), a flower, a kidney bean, a circle, two parallel rectangles (I call this one shape even though technically it's two), and a single rectangle.  For the matching game shapes you'll need to cut three of each.  For tic-tac-toe I simplified things by using blue squares and yellow circles.  You'll need 10 squares and 10 circles.  My largest shape for either game was 2 1/4 in squared.

The below picture shows the matching game pieces after they've been cut.
 
Step 2: With contrasting thread, sew an even grid onto the two game board squares.  The grid lines should be spaced 3 inches apart creating 9 squares.  This can be either machine or hand done.

Step 3:  Pin one of each of the matching game pieces to the center of each grid square on the matching game board.  Applique in place.  I used a blanket stitch for this.

Step 4:  Using a blanket stitch sew together the remaining shapes for both the matching game and the tic-tac-toe games.  Before finishing off each of the shapes, stuff lightly with fiber fill.  You should end up with 9 stuffed shapes for the matching game and 10 for Tic-Tac-Toe,


Step 5:  Center each game board onto the 12 x 12 pieces for the bag body.  Pin in place. Blanket stitch the game boards to the bag pieces.
 
Step 6: Place the bag pieces wrong sides together (game board sides facing outwards).  Pin.  Blanket stitch along the two side edges and the bottom of the bag, leaving the top open.

Step 7: Fold the handle piece in half lengthwise so it becomes 1 in. wide instead of 2.  Pin in place.  Blanket stitch along the raw edges (one long side and two short sides).


Step 8:  When sewing the handle to the bag you want to make sure that the bag will lie flat in order to function as a game board.  Sandwich one end of the handle between the two layers of the bag body close to the blanket stitched edge of the bag.  Stitch all three layers together.  I did two rows of stitching to reinforce the handle.  Repeat on the other side making sure that the handle is free of unwanted twists before you stitch the other side down.
 
Step 9: Fill the bag with the game pieces.  Since Levi is only 2, I left the tic-tac-toe pieces out.  I figure the bag can grow with him, and when he's ready for tic-tac-toe then I'll hand over the corresponding pieces.


This bag has turned out to be a hit.  Levi often requests to "make it" which I suppose is his way of saying "match it".

He also just loves to carry the shapes around.  Apparently, a furrowed brow is necessary for this job...


If you make one of your own, I'd love to hear about it. 

Thursday, December 10, 2009

Wreaths For The Birds...A Tutorial

*This post was featured on One Pretty Thing!*

"Look at the birds of the air; they do not sow or reap or store away in barns, and yet your heavenly Father feeds them. Are you not much more valuable than they?"
Matthew 6:26

Yesterday we made bird feeder wreaths.  Levi really enjoyed this one, and as we were crafting he was shouting "Feed birdies, feed birdies!".
So, here goes a step by step "tutorial"...

Step 1:  Collect supplies.  We used muscadine vines.  Any type of (non-poisonous) thin, bendable vine should do.

We also collected some greenery (rosemary and moss), magnolia leaves (these weren't actually for the wreaths, but they come in handy), peanut butter, twine, and bird seed.

Step 2:  While collecting supplies, you should definitely take a moment to admire the view.  Because, the world is beautiful...

Step 3:  Give your munchkin a pair of scissors and a magnolia leaf.  This will buy you time while you make the wreaths...

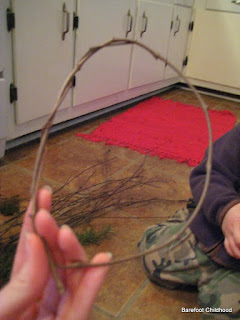
Step 4: While your munchkin is busy, take one length of vine and wrap it to create a circle...

Step 5: Continue wrapping vines around your circle until you like your wreath.  The twisted vines hold themselves together, so there's no need for glue...

At this point you can add greenery or just leave it plain.  We opted for one of each.  Rosemary tucks nicely into the wreath and can be wrapped around, and moss can be stuck on with peanut butter in a later step.

Step 6:  Tie a piece of twine around the top of your wreath and place on a plate.  You'll probably have peanut butter and bird seed everywhere despite the plate, but I still suggest the plate...

Step 7:  Smear on the peanut butter, and add seeds.  At this point the munchkin is highly likely to temporarily loose interest in chopping up magnolia leaves....

Step 8:  Take your wreaths outside and hang on some branches for the feathered varieties to enjoy...

Step 9:  When your munchkin plops down on a pile of posts, and says, "Take picture, take picture."  Well, you should definitely take a picture...

Enjoy!

Thursday, December 3, 2009

Paper Flurry

And, the Advent activities continue....

Yesterday, we made lots of snowflakes.  Okay, okay, really I made snowflakes, and he made a paper flurry.  But, either way it was loads of fun.  Today, we'll be baking cookies.  Levi love, love, loves to cook, so we'll be a mixin' and a bakin' up a storm.  Hopefully, we'll come up with something edible that can be packaged up and delivered to friends and neighbors.

So, just in case your brain is a tad fuzzy on snowflake making, here's a little how to for you:

Step 1: Give your little munchkin scissors and scraps of paper.  Expect a mess...a very large, very fun mess...


Step 2:  Cut out squares of white paper for any adults and/or older children who want to get in on the scissor action....

Step 3: Fold Squares in half (corner to corner)...


Step 4: Fold in half again...         
                   
 
And, once again, if so desired. With smaller squares of paper this extra step often makes for difficult chopping...  
 
 
Step 5:  Cut a small piece out of the folded corner...This can just be straight across or you can get fancy with your snipping.  This will be the center of your snowflake.  I cut a small curved triangle out of mine.

Step 6:  Cut shapes out of the folded sides.  Be careful not to snip all the way through to any of the corners.  In other words leave spaces intact on each side of your cuts.

Step 7:  Cut along the non-folded side.  Being careful not to cut into any of the previously cut out spaces.

Step 8: Open, and enjoy.

Step 9: After you've made a kazzillion of these, it is likely that your little munchkin will grow bored with chopping, so hand over some stickers.  We're particularly fond of gold stars... 

Step 10:  Let the kid decorate...because stars make everything prettier...


Oh, yeah, and those fabulous snowflakes you cut out.  Well, they make for some pretty nice window decor...

But, I would suggest getting your fall pumpkins out of your lovely new wintry scene.  Hmmm....me thinks it's about time to pass those along to the chickens.

Other ways to use up the flurry of snowflakes sure to ensue...
:: glue to folded paper to make Christmas cards.
:: Let the munchkins use them in a Christmas collage.
:: Attach to string to create a garland.
:: Tie them onto the tree.
:: Or, package them up in a large mailing envelope, and send a flurry of snowflakes to a friend.

So, what would you do if a flurry of paper snowflakes landed on your doorstep?

Tuesday, December 1, 2009

Kicking Things Off

I promise. I won't torture you with every single daily Advent activity. But, since day one's activity was quite a hit with the munchkin, I thought I'd share. After Levi opened Sunday's box and looked all enthused over finding a little, round piece of paper inside...and after he spent FOREVER playing with the wooden Advent calendar, affectionately known as his "Crima" house...and after he cried when he thought he had broken it by opening a door...we finally read the little, round piece of paper.

"Trace your hand to make a wreath."

It is highly possible that the success of this activity is directly linked to Levi's love for having his hand traced (which he oh.so.cutely refers to as "chasing"). If your kiddo isn't so in love with "chasing" then just trace his hand a couple of times, and then copy it. Levi, however, wanted me to trace his hand 20 times...no lie. I'm pretty sure if he hadn't gotten distracted by his "Crima" house, we would have been "chasing" that hand of his til doomsday.

The actual assembly of the wreath is super simple. I did this part during nap time, and I wasn't feeling very good. So, it truly is simple. Once you have all your hands cut out. Take a scrap piece of thin cardboard (cereal box thickness) or poster board. Draw one large circle and a smaller circle inside of it. You can use a compass for this, or you could just pull a couple of bowls out of the cabinet and "chase" some more. This will be your wreath base. It should be between 1 1/2 and 2 inches wide. Cut it out. Begin stapling the hands to the wreath base in one direction. You'll want to overlap the hands so that the staples are hidden. When you've completed half the wreath, begin stapling the hands in the opposite direction. This should create one space at the top where the staples are exposed. Cut a bow out of paper or tie one from scrap ribbon. Glue or tape in place to hide the staples. And, you're done. I used painter's tape to attach it to a door.

You can leave yours as is, or turn it into an Advent wreath. Advent wreaths typically have four candles...one for each Sunday before Christmas. In some traditions the candles are all blue or purple. In others three of the candles are blue or purple with the fourth being pink. And, in more modern traditions there is a fifth white candle for Christmas Eve or Christmas.

Instead of candles, I opted for stars. They go along with the Christmas theme, and they just happen to be Levi's all-time favorite shape. Of course, Levi loved getting to put a "stah" sticker on his wreath yesterday.

There are still a few more blanks to be filled in on the munchkin's Advent activities list, but I think we're off to a pretty good start. Most of the activities involve baking, making gifts and reading Christmas books. Any suggestions? I'd love to hear them. What do you do to build up anticipation for Christmas? And, how do you get your kids into the spirit of the season?

Sunday, November 29, 2009

And The Count Begins

Just in case you've been on the edge of your seats wondering what I decided to do about that last minute DIY Advent calendar....well, for the sake of my own sanity, I didn't stitch one up. But, I did still make one.
In the end, the paper Christmas mural above my sofa was targeted as the new Advent calendar. (Please excuse the lousy photos. I tried and tried, and this was seriously the best of the bunch...sad...I know. Where the black ring came from, I can't figure out. And, that's so not the color of my wall.)
Instead of giving Levi candies or toys each day, I opted to make small, numbered ornaments for him to decorate the mural with. Each one has a Christmas related activity written on the back. We already have a wooden Advent calendar, so I put the ornaments in their corresponding boxes. Each day he opens a box. If he's into the activity we do it...if not I'm up for something new. Afterward, I stick a bit of tape on the ornament, and he places it on one of the trees in the mural. He's totally into stickers, so this is his favorite part. Can you believe how neatly he placed that #1?!
If you're digging this idea, but you aren't so keen on cutting out an entire snowy scene, there is still hope. Just cut out a paper or cardboard tree, and attach it to a door or wall with painter's tape.
Create the ornaments by gluing together scrap paper circles and squares. Grab a marker and you're good to go on the numbers.
You don't have a wooden Advent calendar? No problem! There's more than one way to skin a cat.
~Put the ornaments in small, numbered envelopes.
~Hide them around the house and have a scavenger hunt each day.
~Place them under your child's pillow tooth fairy style.
~Or just dole them out one at a time.
The delivery methods are endless. Let me know what fabulous ideas y'all come up with.

Hope Advent is off to great start!

Wednesday, November 4, 2009

An Easy Peasy Hat

I have a new favorite way to make hats...
These are seriously easy. Step 1: Felt a very large, thrifted wool sweater (wash on hot and dry). Step 2: Cut the arm off of the sweater. Cut along the edge of the armhole. Step 3: Tie a knot at the end of the sleeve--towards the wrist. All done!
I wish I knew where I found this idea. I can't for the life of me remember! I made one in green, too. Levi looks like a little elf when he wears it.
This kid has a ridiculously large hat collection. I generally knit and crochet them, but this was too easy and fun not to try. So, do you have any favorite super easy crafts?